
Table of content
You have an image or other file locally or in your clipboard that you want to easily publish to the internet and get a shareable URL to send to someone or to link to from a blog post.
You can do this for free on sites like Imgur, but they also display many adverts, and you ultimately lose control of what you upload: It’s hard to delete a file later if you uploaded it as an anonymous user.
In this tutorial, we’ll build a basic image-uploading site similar to Imgur that lets users upload files and instantly get a public URL, without requiring an account or anything else. You can even host it on a custom domain, so you can share URLs like
i.mycompany.com/123456778.png
instead of
i.imgur.com/epzw0Sc.png
.
To build our site, we’ll use:
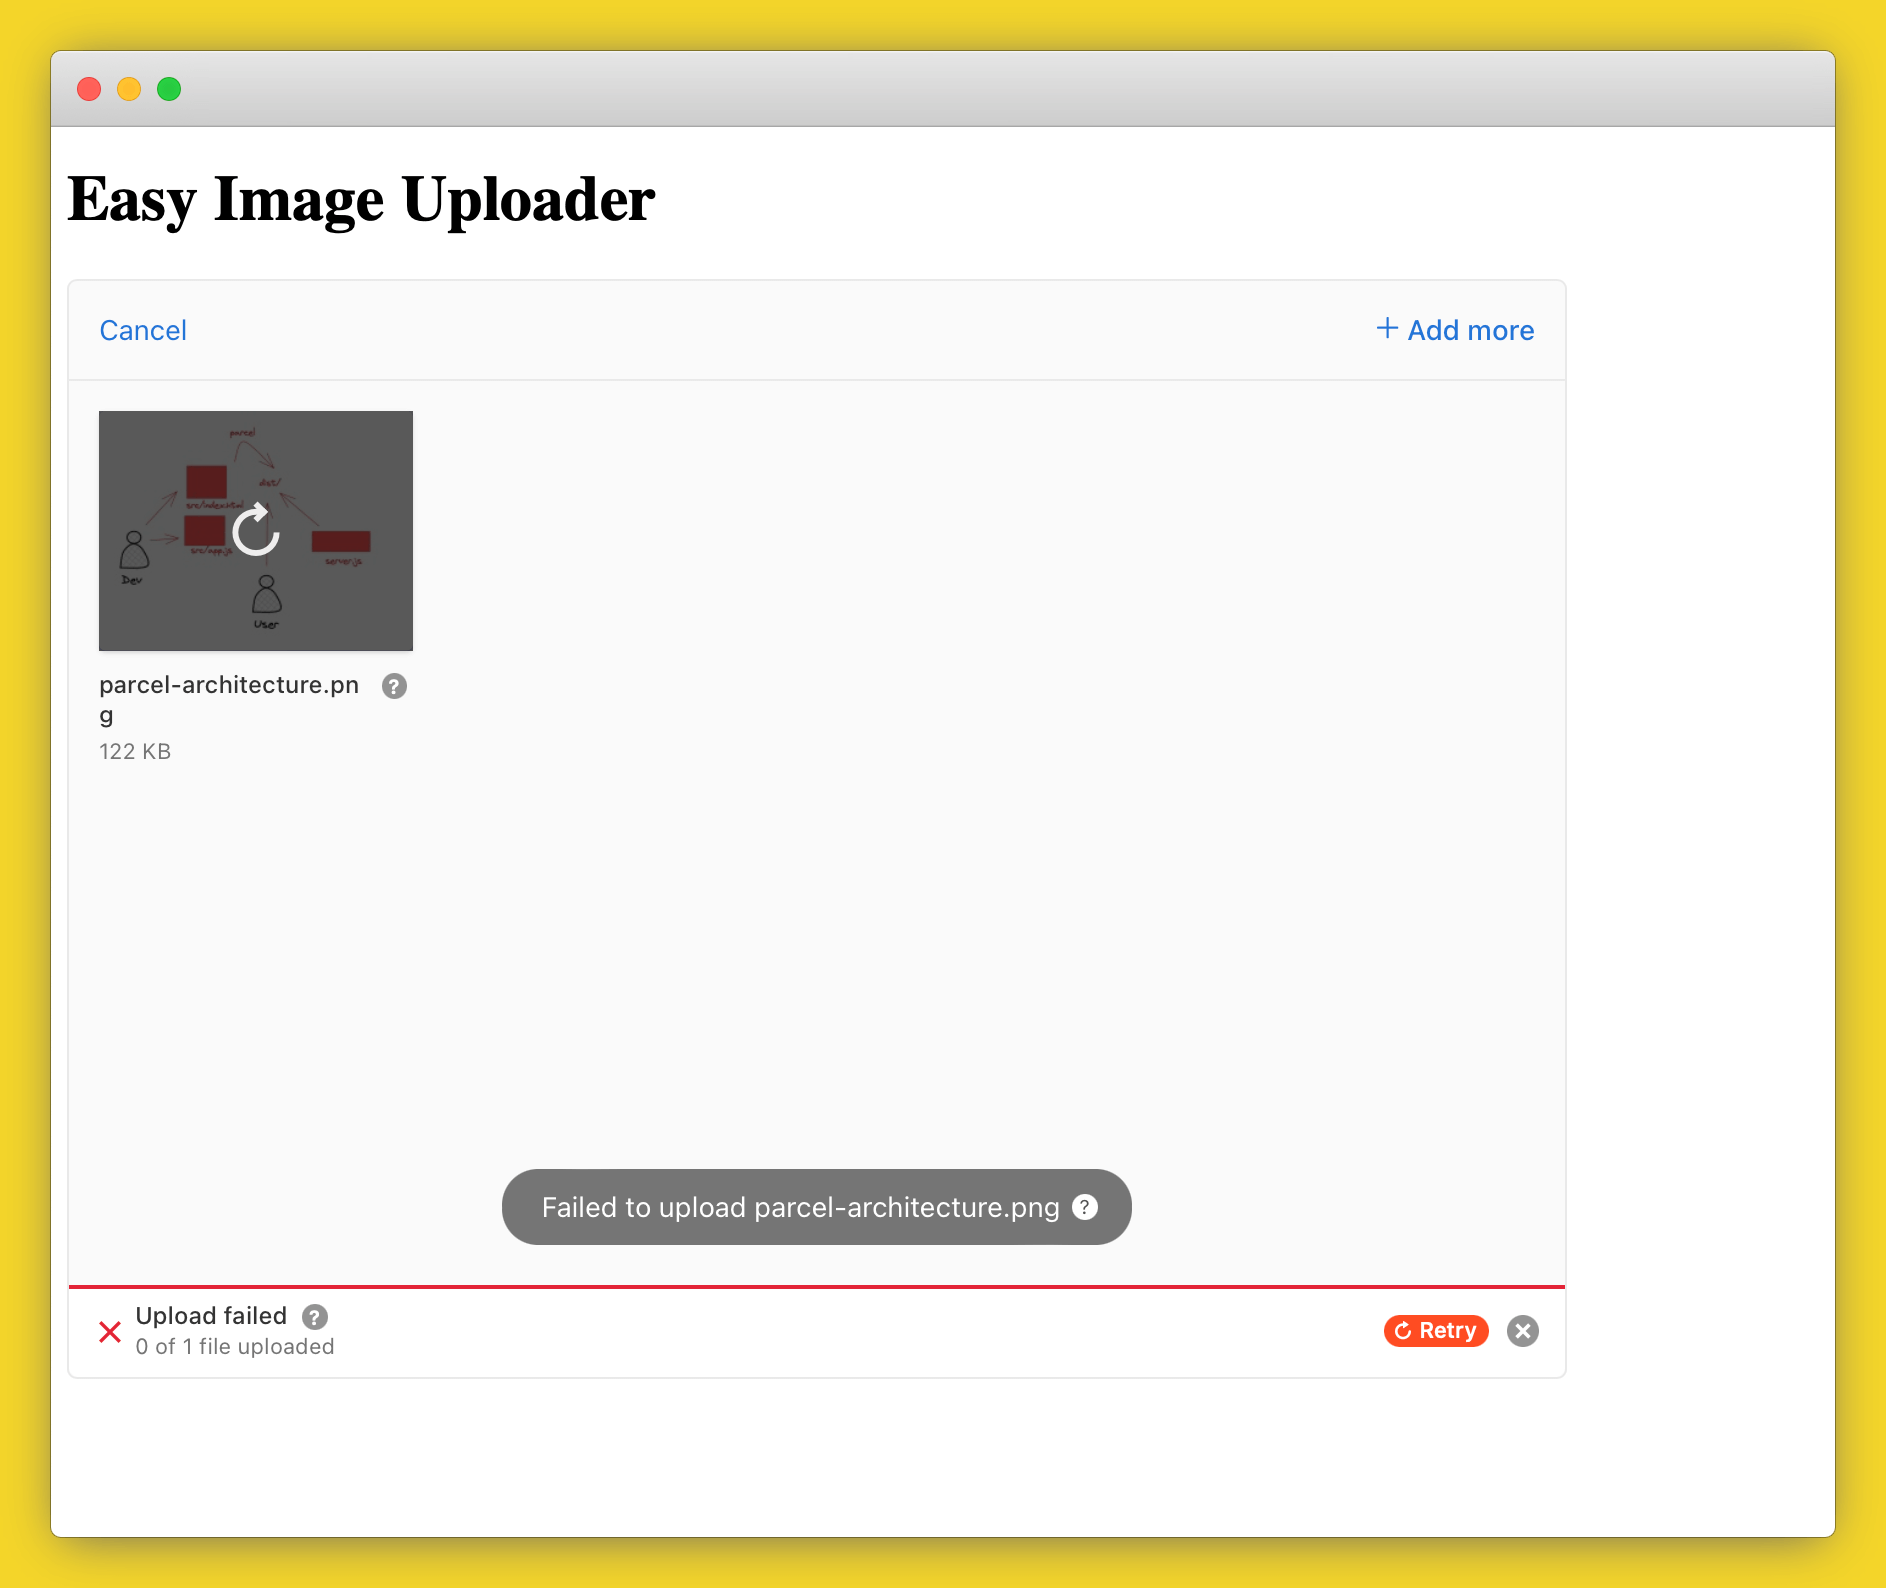
The final app will look like this.
To follow along, you should have some basic Node.js and Docker knowledge and have Node.js and Docker installed locally. You’ll need to install some packages from Node.js and run Parcel and Docker to build the application.
We’ll split our application into a few different files with the following structure:
image-sharing-app/
src/
app.js
index.html
server.js
package.json
Caddyfile
Dockerfile
Create these files and directories by running the following:
mkdir image-sharing-app
cd image-sharing-app
mkdir src
touch src/app.js src/index.html server.js package.json Dockerfile Caddyfile
Now we can install the packages we need. Add the following to the
package.json
file:
{
"dependencies": {
"@uppy/core": "^3.0.4",
"@uppy/dashboard": "^3.1.0",
"@uppy/xhr-upload": "^3.0.3",
"cors": "^2.8.5",
"express": "^4.18.2",
"multer": "^1.4.5-lts.1"
}
}
Now run
npm i
to install the dependencies. Next, run:
npm install parcel -g
This installs Parcel globally, so we can call it from the command line. We’ll use Parcel because Uppy is a big package, and we’ll only be using small parts of it. Parcel lets us use syntax like
import Uppy from '@uppy/core';
in a vanilla JavaScript file, instead of having to pull in the entire Uppy package from a CDN using syntax like
<script src="https://releases.transloadit.com/uppy/v3.2.2/uppy.min.js"></script>
which would include all of Uppy’s plugins and make our app a lot slower to load.
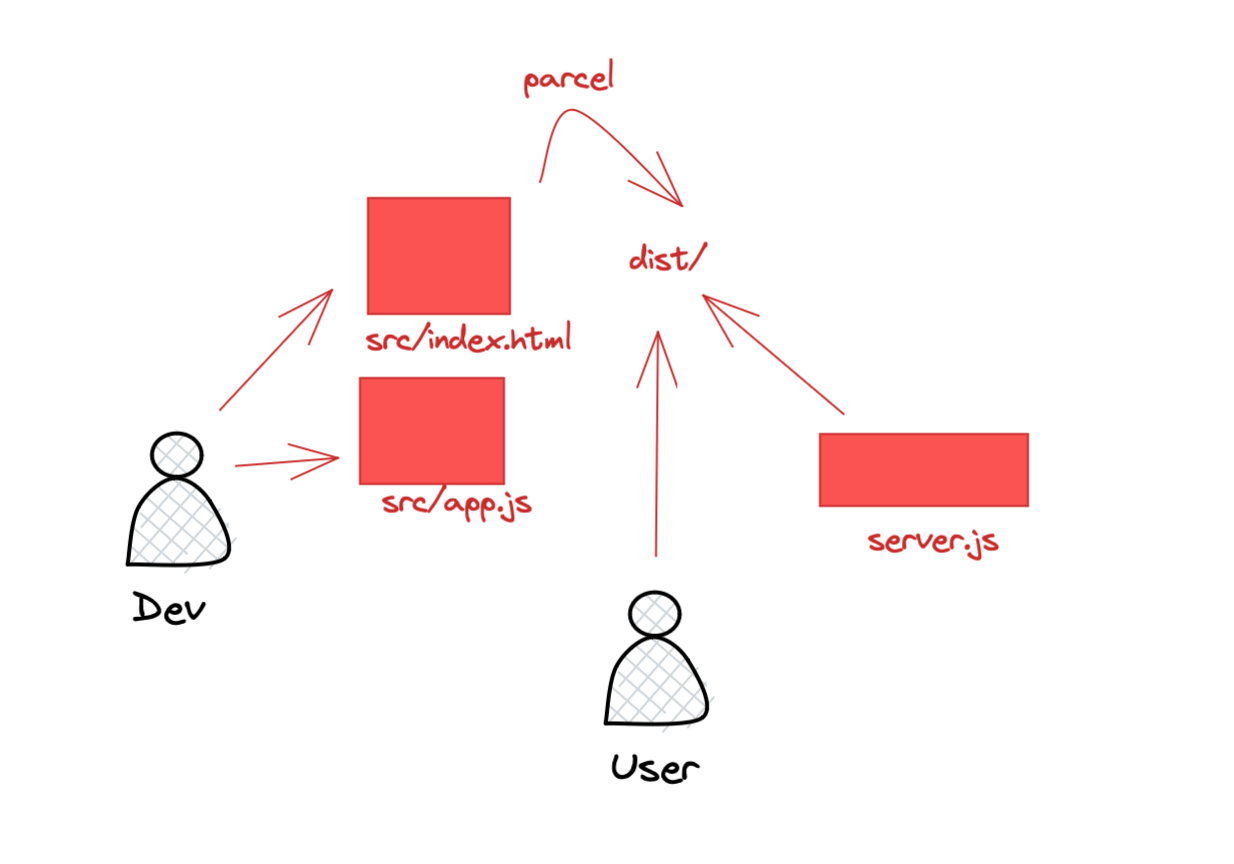
You’ll modify files in the
src
folder (
index.html
and
app.js
), and Parcel will hot-copy any changes over to the
dist
folder whenever you save the
src
files. The
server.js
file will return the (now static) files in
dist
so you can test and use the application. This is shown in the image below.
index.html
fileIn
src/index.html
, add the following code.
<!DOCTYPE html>
<html>
<head>
<meta charset="utf-8"/>
<title>Image Uploader</title>
<link
href="https://releases.transloadit.com/uppy/v3.2.1/uppy.min.css" rel="stylesheet"/>
</head>
<body>
<h1>Easy Image Uploader</h1>
<div id="drag-drop-area"></div>
<ul id="links"></ul>
<script src="app.js" type="module"></script>
</body>
</html>
This is a very minimalistic HTML page that pulls in the CSS needed to style our Uppy upload widget and creates a blank div (
"drag-drop-area"
) that we’ll use in our JavaScript file to populate the upload panel.
app.js
fileIn
src/app.js
, add the following code:
import Uppy from '@uppy/core';
import XHRUpload from '@uppy/xhr-upload';
import Dashboard from '@uppy/dashboard';
const uploadUrl = `${process.env.HOST_URL}/image`;
const uppy = new Uppy()
.use(Dashboard, {
inline: true,
target: '#drag-drop-area',
})
.use(XHRUpload, {
endpoint: uploadUrl,
fieldName: 'userFile',
formData: true,
})
This imports the Uppy dependencies, including Uppy Core (which is the main part of Uppy) and Uppy Dashboard (which lets you display the nice drag-and-drop widget for users to upload files). We also get
xhr-upload
, which is a plugin to allow users to upload a file and submit it to the server without leaving or reloading the main page. Uppy uses a plugin-based architecture, so if you want to get files from other sources, you can grab the plugin for that provider.
We then define an
uploadUrl
using an environment variable that we haven’t set yet. We do this, so we can upload to
localhost:3000
for testing, but to a real URL once we are running the app in production.
Finally, we create an Uppy instance that uses the Dashboard and XHRUpload plugins we imported earlier.
Note that this is just a plain JavaScript file, but we are using
import ... from ...
syntax that isn’t supported in JavaScript. Parcel will convert this file to vanilla JavaScript and save it in the
dist
folder for us.
server.js
fileNow let’s build a basic Express app. At first, it’ll just return the frontend
index.html
file we wrote above, but later it will also save the files that the user uploads.
Add the following code to
server.js
:
const express = require('express');
const cors = require('cors');
const path = require('path');
const multer = require('multer');
const app = express();
app.use(express.static('dist'));
app.use(cors());
app.get('/', (req, res) => {
res.sendFile(path.join(__dirname + "/dist/index.html"));
});
const port = process.env.PORT || 3000;
app.listen(port, () => {
console.log("listening on port " + port);
});
This code creates a simple Express app and returns the HTML file in
dist/index.html
that Parcel will create for us in the next step.
The application can’t actually save uploaded files yet, but let’s test it out to see what it can do so far. In one terminal, run
parcel src/index.html
and you should see output similar to the following:
image-sharing-app$ parcel src/index.html
Server running at http://localhost:1234
✨ Built in 234ms
Parcel has created the
dist
folder for you and copied over the source files. If you look in the folder, you’ll see that each file has a unique number so that changes can happen in real-time without being affected by browser caching. Your
dist
folder will have files similar to the following (but with different numbers):
index.0641b553.js
index.html
index.0641b553.js.map
If you look in each file, you’ll see that they are optimized for serving and not meant to be edited by a developer. While the Parcel server is running, you can make changes in the
src
folder and Parcel will take care of copying them over to
dist
for the
server.js
file to serve to the user.
In another terminal window, run
node server.js
to serve the backend Express application. Now you can visit
http://localhost:3000
in your browser and see the upload interface, but if you try to upload a file it will fail as we haven’t written any functionality to handle file uploads yet.
To handle file uploads, we need to add some code to
server.js
to write the files somewhere safe after a user uploads them.
Add the following code to
server.js
, after the
app.get("/"...
definition:
const storage = multer.diskStorage({
destination: `${process.env.PERSISTENT_STORAGE_DIR}`,
filename: (req, file, cb) => {
const fileName = `${Date.now()}${path.extname(file.originalname)}`;
cb(null, fileName);
}
});
const uploadImage = multer({
storage
}).single('userFile');
app.post('/image', uploadImage, (req, res) => {
if (req.file) {
return res.json({
msg: req.file.filename
});
}
res.send('Error uploading file');
});
This creates a
diskStorage
object using
multer
, a Node.js module for handling form uploads. We use another environment variable
PERSISTENT_STORAGE_DIR
to decide where to save the file, and then name the file with the current time to prevent any problems with users uploading files that have the same name.
We then define an
/image
endpoint (where Uppy is sending the files from the frontend) and use this
diskStorage
plugin to save the file to a file system. Furthermore, we also return the file name, which we’ll display to the user later so that they can retrieve the file again.
To test the code again, stop the process in the terminal window running Parcel with
Ctrl + C
, set the environment variables our frontend uses, and start Parcel once more. You can do this by running the following commands:
export HOST_URL='http://localhost:3000'
parcel src/index.html
Do the same in the terminal window serving the Express application and set the PERSISTENT_STORAGE_DIR environment variable:
export HOST_URL='http://localhost:3000'
export PERSISTENT_STORAGE_DIR='/tmp'
node server.js
Now, if you visit the app in your browser, you’ll be able to upload files and see that they are saved in your
/tmp
directory.
Of course, our user can’t guess the exact time stamp that we are using to save the files, so they have no way of getting their files back again. To fix this, let’s have our frontend get the file name of the application and tell the user where the file can be found.
In
src/app.js
, add the following code to the end of the file:
uppy.on('complete', (result) => {
console.log(result);
for (const file of result.successful) {
const url = `${process.env.STATIC_HOST_URL}/${file.response.body.msg}`;
const link = document.createElement('a');
link.href = url;
link.innerHTML = url;
const li = document.createElement('li');
li.appendChild(link);
document.getElementById('links').appendChild(li);
}
});
This tells Uppy what to do once a file has been uploaded by the user (“on complete”). Uppy lets users upload multiple files at once, so we loop through all the files that were successfully uploaded, and create a new list element (
li
) on the page with a link to the uploaded file.
Note that we use a different environment variable here:
STATIC_HOST_URL
. This is because, in the final version of the application, we will serve our files from a different server than the one that handles uploads.
Stop the frontend and backend servers again and add the
STATIC_HOST_URL
environment variable to each by running the following command. Then start both servers again.
export STATIC_HOST_URL='http://localhost:3001'
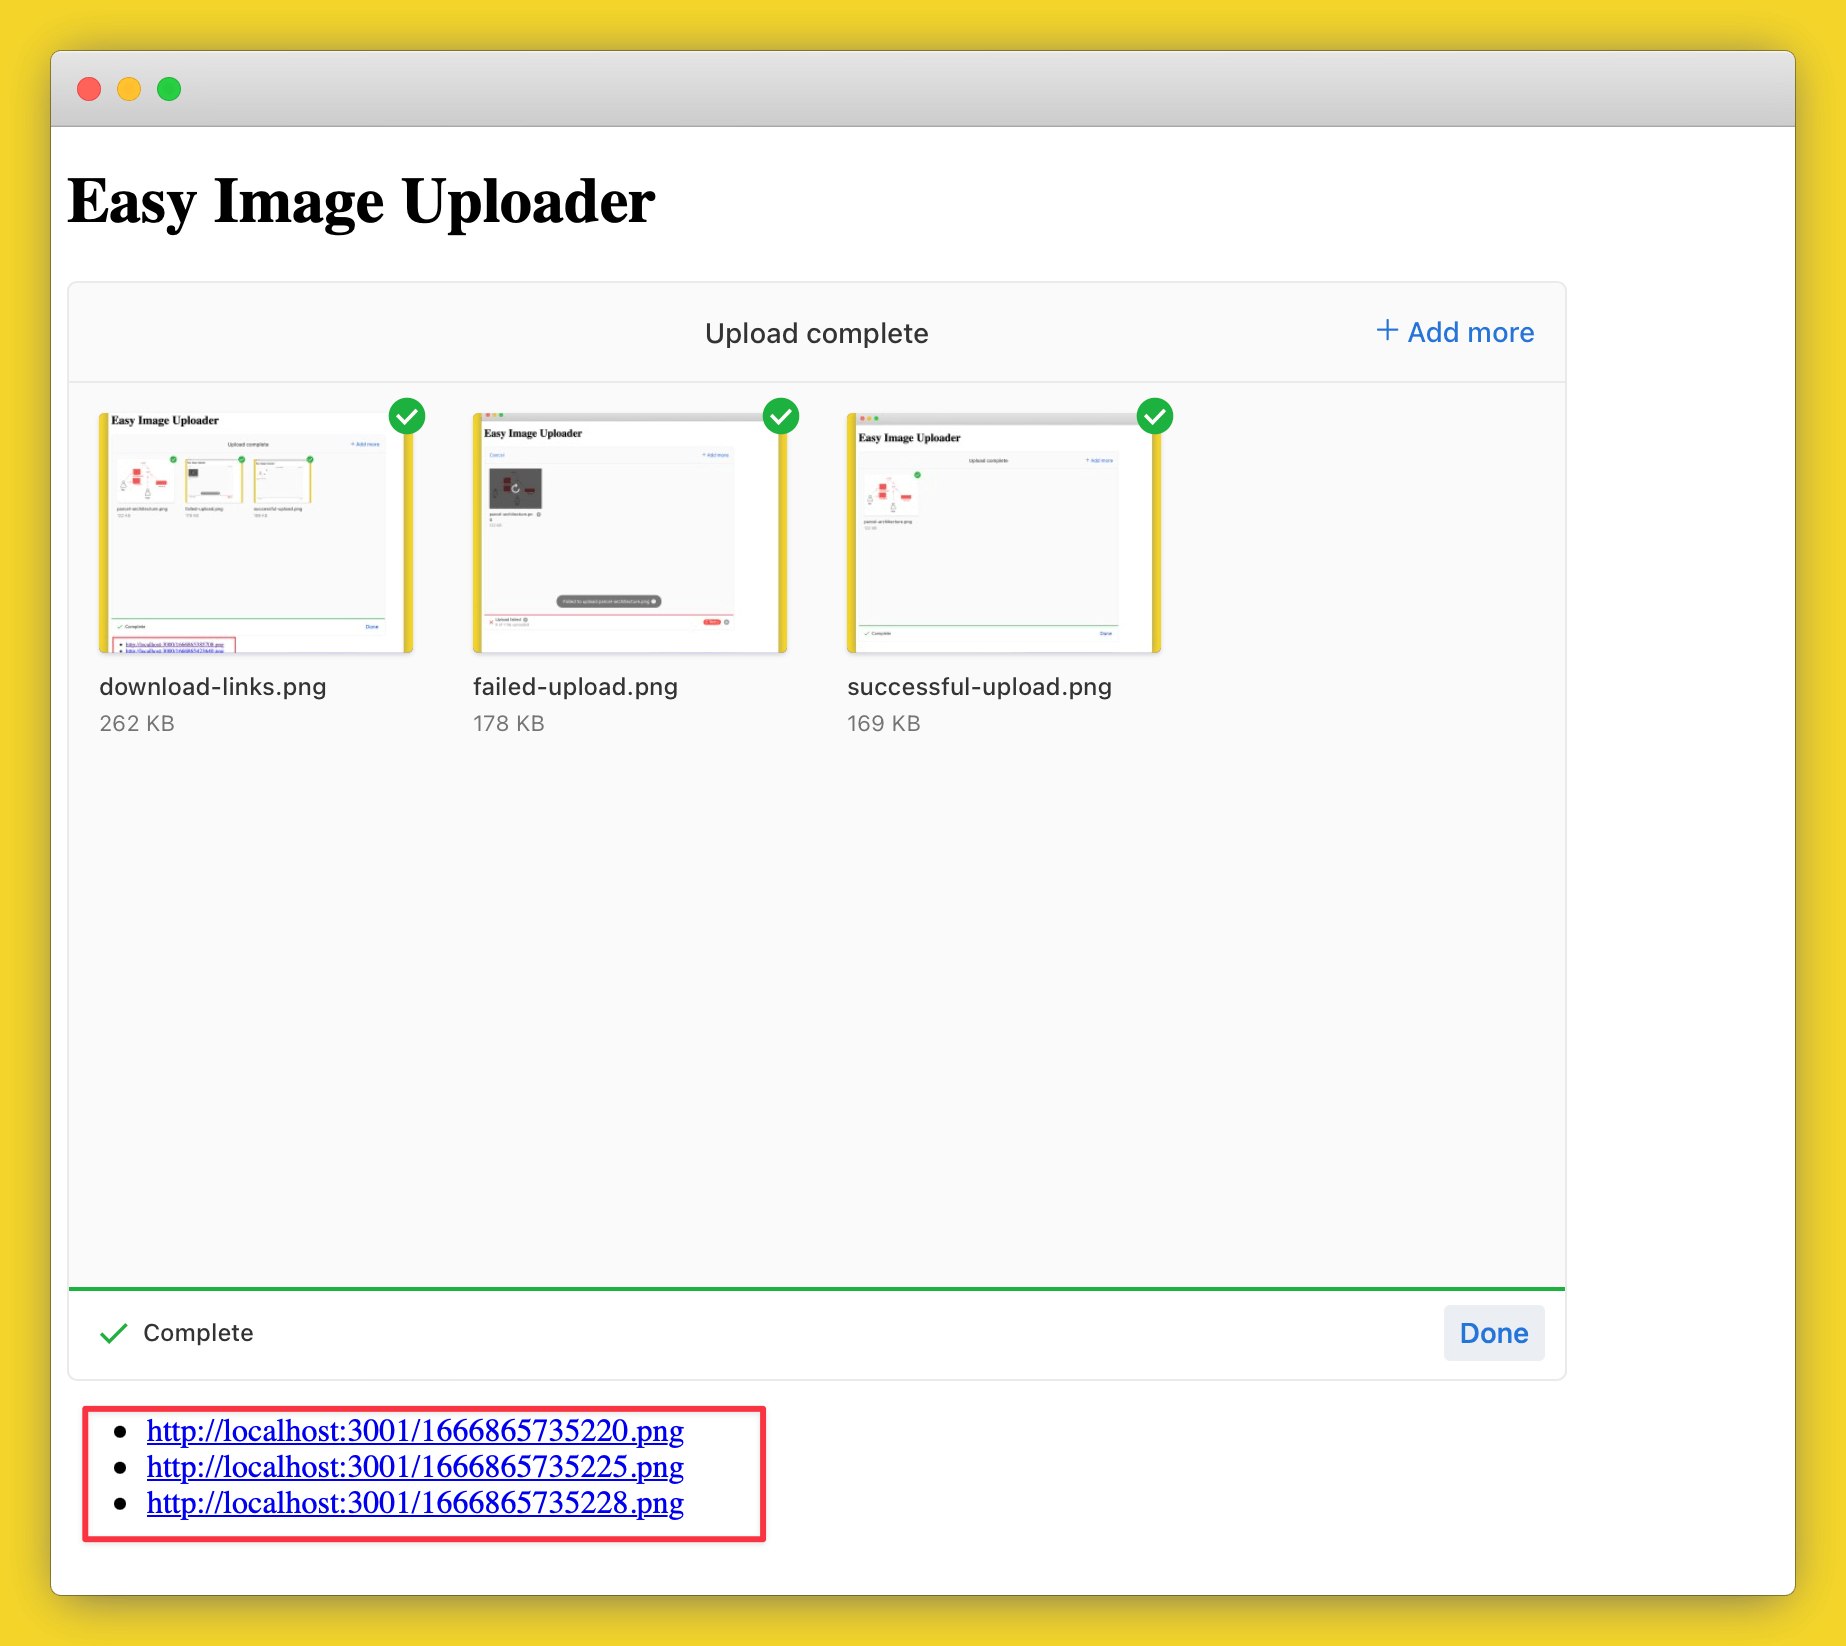
Now when you upload files, you’ll see a list of links displayed below the upload dashboard showing the user where they can download the files again.
Note that these links won’t work yet, as we don’t have anything serving these files. We could serve files directly from the Express application, but we’ll instead use Caddy as a static file server. It serves files more efficiently and means that we detach file uploads from file downloads, so we can add more servers of either type to add either more uploading or downloading capacity.
To serve the files back to the user, we’ll use Caddy and Docker. In the main project directory, create a file called
Caddyfile
with the following contents:
:3000
encode zstd gzip
root * {env.PERSISTENT_STORAGE_DIR}
header Access-Control-Allow-Methods "GET, OPTIONS"
header Access-Control-Allow-Headers "*"
header Access-Control-Allow-Origin "*"
file_server browse
And a file called
Dockerfile
that contains the following:
FROM caddy/caddy:alpine
COPY Caddyfile /etc/caddy/Caddyfile
The first file configures Caddy to serve everything in
PERSISTENT_STORAGE_DIR
. It also allows users to list files by visiting a directory.
The second file is to set up a Docker container with the official Caddy image and copy across our
Caddyfile
to configure it.
In a new terminal window, run the following Docker command:
docker build . -t caddy-file-server && docker run -p 3001:3000 --mount type=bind,source=/tmp,target=/tmp --env PERSISTENT_STORAGE_DIR=/tmp caddy-file-server
This builds the Dockerfile to an image called
caddy-file-server
and then runs that in a container. Because we are already using port 3000 to run our web app locally, we’ll run Caddy on port 3001 but map it to port 3000 in the Docker container as that’s what we configured our Caddyfile to listen on. We also mount our local
/tmp
folder to
/tmp
in the Docker container and pass in
/tmp
as
PERSISTENT_STORAGE_DIR
so that Caddy serves files from there.
Now you can upload images and the links displayed in the frontend will work and let you download the files again. You can also visit
http://localhost:3001
directly to browse all uploaded files (and anything else in your
/tmp
directory).
Now that everything is working, we can create an optimized build to deploy to production. Add the following
scripts
section to your
package.json
file:
  "scripts": {
"serve": "node server.js",
"build": "parcel build --dist-dir dist src/index.html"
}
Now we can build the application by running
npm run build
and serve it using
npm run serve
. You can test these commands locally, but we mainly need them to easily run the production application on Code Capsules as described in the next section.
To deploy the application to Code Capsules, we’ll create three Capsules:
Because of how we set up the three components using environment variables, all we need to do is set these appropriately for each Capsule and everything else will work automatically.
Push the entire project up to GitHub. Although our Caddy server and application server are different projects, we’ll just keep everything in a single repository for convenience.
Create a new Space for this project and create three Capsules in the space as follows:
Data Capsule
Docker Capsule
/Dockerfile
.Backend Capsule
npm run build && npm run serve
.HOST_URL
to the URL for this Backend Capsule.STATIC_HOST_URL
to the public URL of the Docker Capsule.Now you should be able to upload files by visiting the URL of the Backend Capsule and immediately get the public link as before. You can also visit the Docker Capsule URL to browse all files uploaded by any user.
Table of content