
Table of content
Creating graphics for social media is a common task. Often the final file combines a template image with some headline text and a logo. While creating this type of image can be done fairly easily with a graphics app, it can quickly become boring and tedious if you need to do it often.
Luckily, some programming knowledge can help us out. We can automate the task to allow us spare time to do other things, like more programming!
In this tutorial, we’ll build an HTTP REST API to create composite images for social media.
You’ll need the following services and software set up for this tutorial:
With our requirements in place, we can get started on setting them up to work as needed for our web file project.
We need a place to store our code and from which Code Capsules can deploy to a capsule.
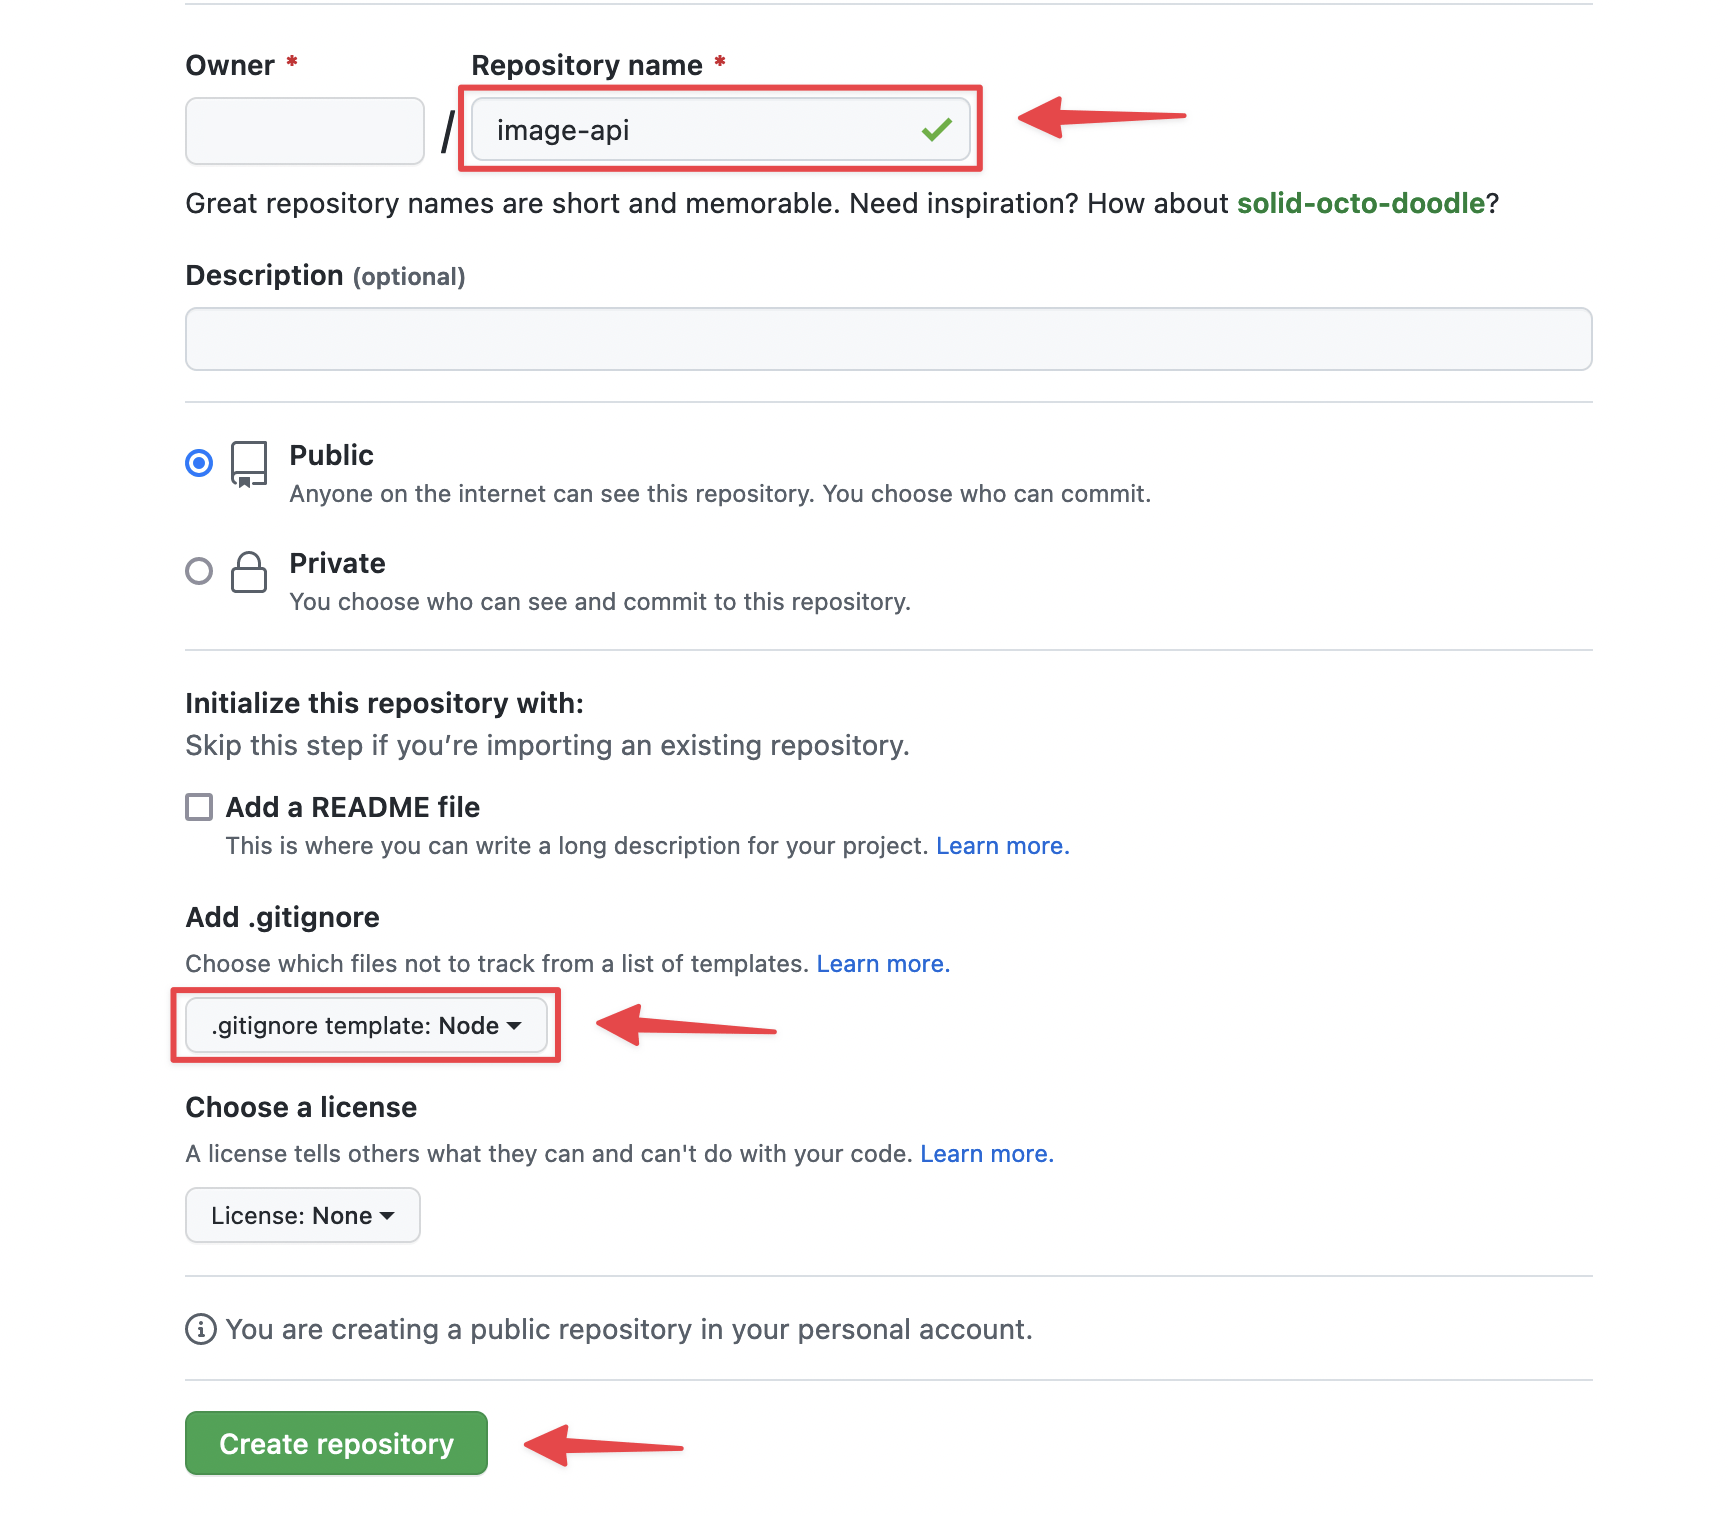
Head over to GitHub and create a new repository. We’re calling the repo
image-api
here, but you can call it whatever you like. You can choose a Node
.gitignore
file to get started.
Let’s get the base code set up. Start by cloning the new GitHub repo onto your local computer and navigate to that directory in a terminal (or command prompt, if you’re on Windows).
We can initialize a new Node.js project by typing the following in the terminal:
npm init
You’ll be asked a bunch of questions – it’s fine to press enter for each of the questions, the defaults are good to start with.
Now that we have our project initialized, we can add the packages we will need for our API. These are:
Type the following in the terminal to install the packages:
npm install express canvas
Now let’s create an
index.js
file, which will be the main file for our app. An easy way to do this is to open up your project folder in an editor like Visual Studio Code. Now you can create a new
index.js
file.
Save this blank file.
We also have a font file that we’ll need to add to the project. Download and copy this font to your project folder.
Great, it’s time to push this boilerplate project up to Git. We can do it with the following from the command prompt or terminal:
git add .
git commit -am 'added libraries, index.js and font'
git push origin
Let’s define the inputs and interface of the API to build. We need the user to provide three elements:
background
.text
to render over the image.logo
to use in the image.A call to the API should look similar to this:
https://image-api.codecapsules.co.za?background=https://example.com/background.png&logo=https://example.com/logo.png&text=my inspirational message
When calling an API, the parameters are separated by
&
and the key-value pairs are separated by
=
. The values are also typically URL encoded to ensure they are not misinterpreted. The above call URL encoded would be:
https://image-api.codecapsules.co.za?background=https%3A%2F%2Fexample.com%2Fbackground.png&logo=https%3A%2F%2Fexample.com%2Flogo.png&text=my%20inspirational%20message
Express is a popular and well established API framework for Node.js. It is built around the concept of middleware functions. Middleware functions are chained together to provide a processing pipeline for an API request. Let’s take a brief look at what that means.
A basic Express API route looks something like this:
app.get("/", function (req, res) {
res.send("Hello World!");
});
In this example,
app
refers to an Express application, which provides all the API functionality. The
"/"
defines the URL endpoint. In this case, it is just the root of the API. The inline function is the route handler, which takes the incoming request
req
, and provides an object to return the API’s result
res
.
This would be enough to create the image API, as we could put all the code in the one route handler function. However, because Express enables multiple middleware functions to be chained together, we can split our code up more logically. Express allows a route to have multiple chained functions, which are run one after the other. Instead of passing the route one route handler, Express allows us to pass an array of them, like this:
app.get("/", [function (req, res, next) {
// do something
next();
}, function (req, res, next) {
// do something else
next();
}, function (req, res) {
// send the response
res.send("Hello World!");
}]);
Notice that the
next()
function is called after each middleware function has completed its particular function. This is how we can chain together multiple middleware functions.
The functions don’t have to be inline – we can use named functions. This makes the code very readable, and it’s like writing down the steps we need to take. We can then implement the functions one at a time.
If we were to break down the processing that the image API needs to do, one sequence could be:
If we write this as a series of middleware functions for the route, it would look something like this:
app.get("/", [
validateRequest,
createIdentifier,
downloadBackground,
downloadLogo,
composeImage,
sendImage,
cleanupFiles,
]);
This is a very readable way to write the code. It becomes clear to others what steps the API route takes, and the order that it takes them. We can implement each of the steps one at a time.
Let’s start by adding the above code to the
index.js
file. We’ll also need to import the Express library and set up the Express app. Put together, we can add the following code to the
index.js
file:
const express = require("express");
const app = express();
const port = process.env.PORT || '3000';
app.get("/", [
validateRequest,
createIdentifier,
downloadBackground,
downloadLogo,
composeImage,
sendImage,
cleanupFiles,
]);
// Add the middleware function implementations below this line
app.listen(port, function () {
console.log(`Image API listening on port ${port}!`);
});
process.env.PORT
when the application is hosted. We provide a default value of
3000
if the environment variable is not set.app.listen()
function to start the server on the given port.Now that we have the outline of the API and a list of all the middleware we need to write, we can implement each step.
To validate the request, we’ll need to check that the request contains the required parameters. Express provides a
req
object that contains all the information about the request. The
req
object has a
query
property that contains the query parameters. We can use this to check that the request contains the required parameters. If it doesn’t, we can return an HTTP
400
error, which means that the there was something wrong with the request from the caller. We’ll also provide a helpful message to the caller, so they are not left guessing what they did wrong. Add the following function just below the
Add the middleware functions below this line
comment.
function validateRequest(req, res, next) {
if (!req.query.background){
return res.status(400).send("missing background");
}
if (!req.query.logo){
return res.status(400).send("missing logo");
}
if (!req.query.text){
return res.status(400).send("missing text");
}
next();
}
Next up, we need to create a unique identifier for the request. This is because we’ll be downloading the images from the request URLs, and we’ll be creating an output composite image. We’ll want to create a unique name so that it’s easy to refer to the images, and so that we can handle multiple requests in parallel. If we just called the downloaded images
background
and
logo
for example, as one request is being served, the files might get overwritten by another incoming request. We’d get the images crossed, and probably end up with some very strange results.
To create a unique identifier, we could just create a random number. This would work a lot of the time, but there is a chance that the same number could be chosen. Luckily, this problem has been solved with the very clever invention of something called a Universally Unique Identifier, or UUID for short. They are also known as Globally Unique Identifiers, or GUIDs. UUIDs / GUIDs are a type of randomly generated identifier that is virtually guaranteed to be unique – in the whole world, not just our project!
Node has a built-in cryptography module
crypto
that can create UUIDs. We can import the
crypto
module by adding the following
require
line to the top of the
index.js
file:
const crypto = require('crypto');
Now let’s implement the
createIdentifier
middleware function. Add the following function just below the previous middleware function:
function createIdentifier(req, res, next) {
const identifier = crypto.randomUUID();
req.identifier = identifier;
next();
}
This function creates a random UUID and stores it in the
req
object. Since the
req
object is passed to each of the following middleware functions, we can access this identifier in all the subsequent functions. You can store all kinds of information on the
req
object – it’s like a backpack that you can put stuff in and carry through all the middleware functions.
Next up is the
downloadBackground
function. We need to make a web call to the URL provided by the caller, and save the image to work with later. We’ll use the built-in
https
module to make the web call, and the
fs
module to save the image to a temporary location.
First, we’ll need to import the
https
and
fs
modules. Add the following
require
lines to the top of the
index.js
file:
const fs = require("fs");
const client = require("https");
Now let’s use these imports in the
downloadBackground
function. Add the following function just below the previous middleware function.
function downloadBackground(req, res, next) {
const url = req.query.background;
const file = fs.createWriteStream(`./${req.identifier}-background.jpg`);
client.get(url, (webRes) => {
if (webRes.statusCode < 200 || webRes.statusCode > 299) {
return res.status(400).send(`Got status code ${webRes.statusCode} while downloading background`);
}
webRes.pipe(file).once("close", () => {
next();
});
}).on("error",(err)=>{
return res.status(500).send("error downloading background");
});
}
Here we retrieve the URL of the image to download from the
req
object. This is stored in the
req.query.background
property. Then we create a file stream to write the image to. We’ll use the
fs
module to create the file stream, using the
createWriteStream()
function. The argument to this function is the path to the file we want to write to. Notice that we combine the
identifier
we added to the
req
, along with the word
background
to make a unique filename.
Then we make the web call to the URL. We use the built-in
https
module, using its
get()
function to make the web call. The first argument to this function is the URL to download the image from. The second argument is a callback function that is called when the web call is complete. The callback function passes a web response object to the callback.
We can check this web response object
webRes
to see if the web call was successful. A simple (but not totally foolproof) way of checking if the call was successful is to check the status code. By convention, web servers should return an
OK
code, which is generally a code within the 200-299 range. Therefore, if the status code is less than 200 or greater than 299, we can return an error and exit early. Note that by calling
res.send
early, we prevent the next middleware function from being called.
If the web call was successful, we pipe the web response to the file stream. This means that the web response will be written to the file stream. When the web response is complete, the file stream is closed. We can check if the file stream is closed by listening for the
close
event. When the file stream is closed, we call the
next()
function to move on to the next middleware function.
The
https
client also has an
error
event that we can listen for. Should any other errors occur, such as network errors, we return an error and exit early.
To download the logo, we’ll need to do the same thing as we did for the background image. Add the following function under the
downloadBackground
function.
function downloadLogo(req, res, next) {
const url = req.query.logo;
const file = fs.createWriteStream(`./${req.identifier}-logo.jpg`);
client.get(url, (webRes) => {
if (webRes.statusCode < 200 || webRes.statusCode > 299) {
return res.status(400).send(`Got status code ${webRes.statusCode} while downloading logo`);
}
webRes.pipe(file).once("close", () => {
next();
});
}).on("error",(err)=>{
return res.status(500).send("error downloading logo");
});
}
Now we get to the heart of the API’s function: putting the images and text together in a composition. The
canvas
module can do all of this for us. First, we’ll need to import the
canvas
module. Add the following
require
line to the top of the
index.js
file:
const { createCanvas, loadImage, registerFont } = require("canvas");
This imports two functions that we’ll need from the
canvas
module. The
createCanvas
function creates a canvas object that we can draw our composite image on, and the
loadImage
function loads images from the file system. Using
loadImage
we can load the images we downloaded earlier, and then draw them to the canvas to create our composite image.
async function composeImage(req, res, next) {
const background = await loadImage(`./${req.identifier}-background.jpg`);
const logo = await loadImage(`./${req.identifier}-logo.jpg`);
const width = background.width;
const height = background.height;
registerFont("./ShortBaby.ttf", { family: "ShortBaby" });
const canvas = createCanvas(width, height);
const context = canvas.getContext("2d");
const logoPadding = 20;
context.drawImage(background, 0, 0, width, height);
context.drawImage(logo, width - logo.width - logoPadding, height - logo.height - logoPadding);
const textPadding = 30;
context.font = "bold 70pt ShortBaby";
context.textAlign = "left";
context.textBaseline = "top";
const textSize = context.measureText(req.query.text);
context.fillStyle = "rgba(255, 255, 255, 0.8)"
context.fillRect(0, 0, textSize.width + 2*textPadding, 200);
context.fillStyle = "#444";
context.fillText(req.query.text, textPadding, textPadding);
const buffer = canvas.toBuffer("image/png");
req.compositeImageBuffer = buffer;
next();
}
There is quite a bit of code in this function, so let’s break it down. In the first two lines, we load up the
background
and
logo
images from file using the
loadImage
function, along with the identifier we stored in the
req
object.
In the following two lines, we extract and store the width and height of the background image. Then we load up our font to use, before creating a new, blank canvas object with these dimensions. A blank canvas is like opening up Paint and creating a new file. After we create the canvas, we get a reference to the context of the canvas. The context is the interface to the canvas, and it’s the way we draw onto the canvas. It has all the functions to add images, text, shapes, fills, etc. to your canvas. You can think of it as equivalent to the tools palette in Paint or Photoshop, with all the brushes, pens, buckets, etc.
Because we want the logo to be a little indented from the right and bottom of the background image, we use the
logoPadding
variable to define the amount of padding we want. Then we draw the background image to the canvas, using the
drawImage()
function. The first argument to this function is the image we want to draw, and the second and third arguments are the x- and y-coordinates of where we’ll place the top-left corner of the image. The next two coordinates are the width and height of the image we wish to draw.
Then we draw the logo image to the canvas using the
drawImage()
function again. This time, we place it in the bottom-right corner of the canvas, adjusted by the padding amount.
Now we need to add the text to the image. We define a padding value for the text, as we want it offset from the sides of the image. We use the
textPadding
variable to define this amount. Then we define the font and size we want the text to be, along with the alignment when we draw it.
Text drawn straight onto an image can be difficult to read, especially if the image has colors close to the text. To solve this problem, we’ll first draw a background rectangle behind the text. This will give us a nice contrast between the text and the background. To find out how wide this background should be, we use the
measureText()
function. This function returns an object with the dimensions in pixels of the area the text will occupy, given the set font and size. We also set the
fillStyle
to specify the color the background should be. We’re using
rgba
notation, which specifies the red, green, blue, and alpha values for the color. Alpha is the amount of transparency the fill should have, on a scale from 0 (totally transparent) to 1 (totally opaque). We then use the
fillRect()
function to draw the background rectangle. The first two arguments are the x- and y-coordinates of the top-left corner of the rectangle, and the next two arguments are the width and height of the rectangle. We pad the edges of the background rectangle a bit to make sure the text is not too close to the edges of the background.
Now we can finally draw the text. The first thing is to set the font on the context, and specify the alignment. Then we change the
fillStyle
to the color we want for the text. This time, we’re using Hex notation for the color, in RGB order. The code
#444
is dark gray. Then we use the
fillText()
function to draw the text. The first argument is the text we want to draw, and the next two arguments are the x- and y-coordinates of the top-left corner of where we intend to draw the text. This is our padding offset.
Finally, we use the
toBuffer()
function to convert the canvas to a buffer, which is a binary representation of the image that we can use to write an image file. We then use the same trick we used to store the
identifier
on the request object
req
so that it is available to the next middleware function to use.
Now we need to send the image back to the API caller. Add the following function after the
composeImage
function:
async function sendImage(req, res, next) {
res.setHeader("Content-Type", "image/png");
res.send(req.compositeImageBuffer);
next();
}
This function sets the header’s
Content-Type
to
image/png
, which lets the API caller know the data type to expect. Then we use the
send
function on the result object
res
to send the image buffer we saved onto the
req
object back to the API caller. Then we call
next()
to move on to the next function in the pipeline.
The next step is to clean up the downloaded files, as we don’t need them once the image has been created and sent back to the API caller. We add empty callbacks, as we don’t really need the result of the operation. In a production system, you might log the result in case there is an error when deleting. Add the following function after the
sendImage
function:
async function cleanupFiles(req, res, next) {
fs.unlink(`./${req.identifier}-background.jpg`, () => {});
fs.unlink(`./${req.identifier}-logo.jpg`, () => {});
next();
}
Now that the API is complete, we can test it out. First, we need to start the API. From a terminal, run the following command:
node index.js
You should see the message
Image API listening on port 3000
in the terminal. Our API is now listening for requests on port 3000.
Let’s test our API out with some example images and text. We’ll use the Code Capsules logo, and a stock image background image we’ve linked here. And of course, for the text, we’ll use the classic “Hello World”.
Combining all this into the URL to call our API looks like this:
http://localhost:3000?background=https://codecapsules.io/docs/assets/tutorials/image-api/background.png&logo=https://codecapsules.io/assets/images/v2/logo-code-capsules-brand-dark.svg&text=Hello World
As we discussed earlier, before we call this, we need to URL encode the parameters. There are a few online services to do this, like https://www.urlencoder.io. After encoding the URL, it should look like this:
http://localhost:3000?background=https%3A%2F%2Fcodecapsules.io%2Fdocs%2Fassets%2Ftutorials%2Fimage-api%2Fbackground.png&logo=https%3A%2F%2Fcodecapsules.io%2Fassets%2Fimages%2Fv2%2Flogo-code-capsules-brand-dark.svg&text=Hello%20World
If you have
curl
installed, you can use the following command to test it out:
curl -X GET "http://localhost:3000?background=https%3A%2F%2Fcodecapsules.io%2Fdocs%2Fassets%2Ftutorials%2Fimage-api%2Fbackground.png&logo=https%3A%2F%2Fcodecapsules.io%2Fassets%2Fimages%2Fv2%2Flogo-code-capsules-brand-dark.svg&text=Hello%20World" > output.png
This will create the image, and save it to the file
output.png
. Open it up, and you should see the following:

You can also test it out directly in the browser by visiting the following URL:
http://localhost:3000?background=https%3A%2F%2Fcodecapsules.io%2Fdocs%2Fassets%2Ftutorials%2Fimage-api%2Fbackground.png&logo=https%3A%2F%2Fcodecapsules.io%2Fassets%2Fimages%2Fv2%2Flogo-code-capsules-brand-dark.svg&text=Hello%20World
Let’s add and commit all the files we created to our local repository and then push them to the remote one. Do this by running the commands listed below in a terminal while in the project’s root folder:
git add -a
git commit -m "Added image editing files"
git push -u origin main
Your remote repository will now be up-to-date with your local one.
The final step is to deploy our app. Log in to your Code Capsules account and link your remote GitHub repository to Code Capsules. Create a Backend Capsule to deploy your app. You can follow this deployment guide to see how to do so in greater detail.
That’s it! Your image editing app should be live and fully functional now.
Nice work on building an API! Hopefully, you’ve seen the possibilities of building APIs with Node.js and Express. If you’d like to learn more about Express, check out the Express website.
Some things you can do to improve the API or just to experiment with it are:
https
module to download the images. This only supports HTTPS requests. We can use the
http
module to download the images if we want to support HTTP requests as well. Or you can try another HTTP client library like
axios
.The background image we used is from https://opengameart.org/content/background-3.
The font “ShortBaby” is from https://www.fontspace.com/short-baby-font-f34907.
The logo is from Code Capsules.
Table of content