Single page frameworks like Angular, React, and Vue have become the go-to solution for frontend development recently. This shift from traditional multipage websites is mainly due to the lack of interactivity offered by HTML. It’s worth noting, however, that single page applications (SPAs) aren’t a perfect solution, as they introduce an added layer of complexity by installing a host of other dependencies that need to be linked together before deploying your site to production.
This is where a new HTML extension called HTMx enters and shines. HTMx gives traditional HTML sites more interactivity while keeping things simple, as it allows you to make requests from any HTML element and not just <a> and <form> tags. But this is not HTMx’s only benefit. Other benefits include:
- Making it possible to perform partial page reloads in HTML.
- Support for PUT and DELETE methods in addition to GET and POST.
- Not being limited to click and submit event triggers only.
- Lightweight set up – no additional dependencies need to be installed to get HTMx working.
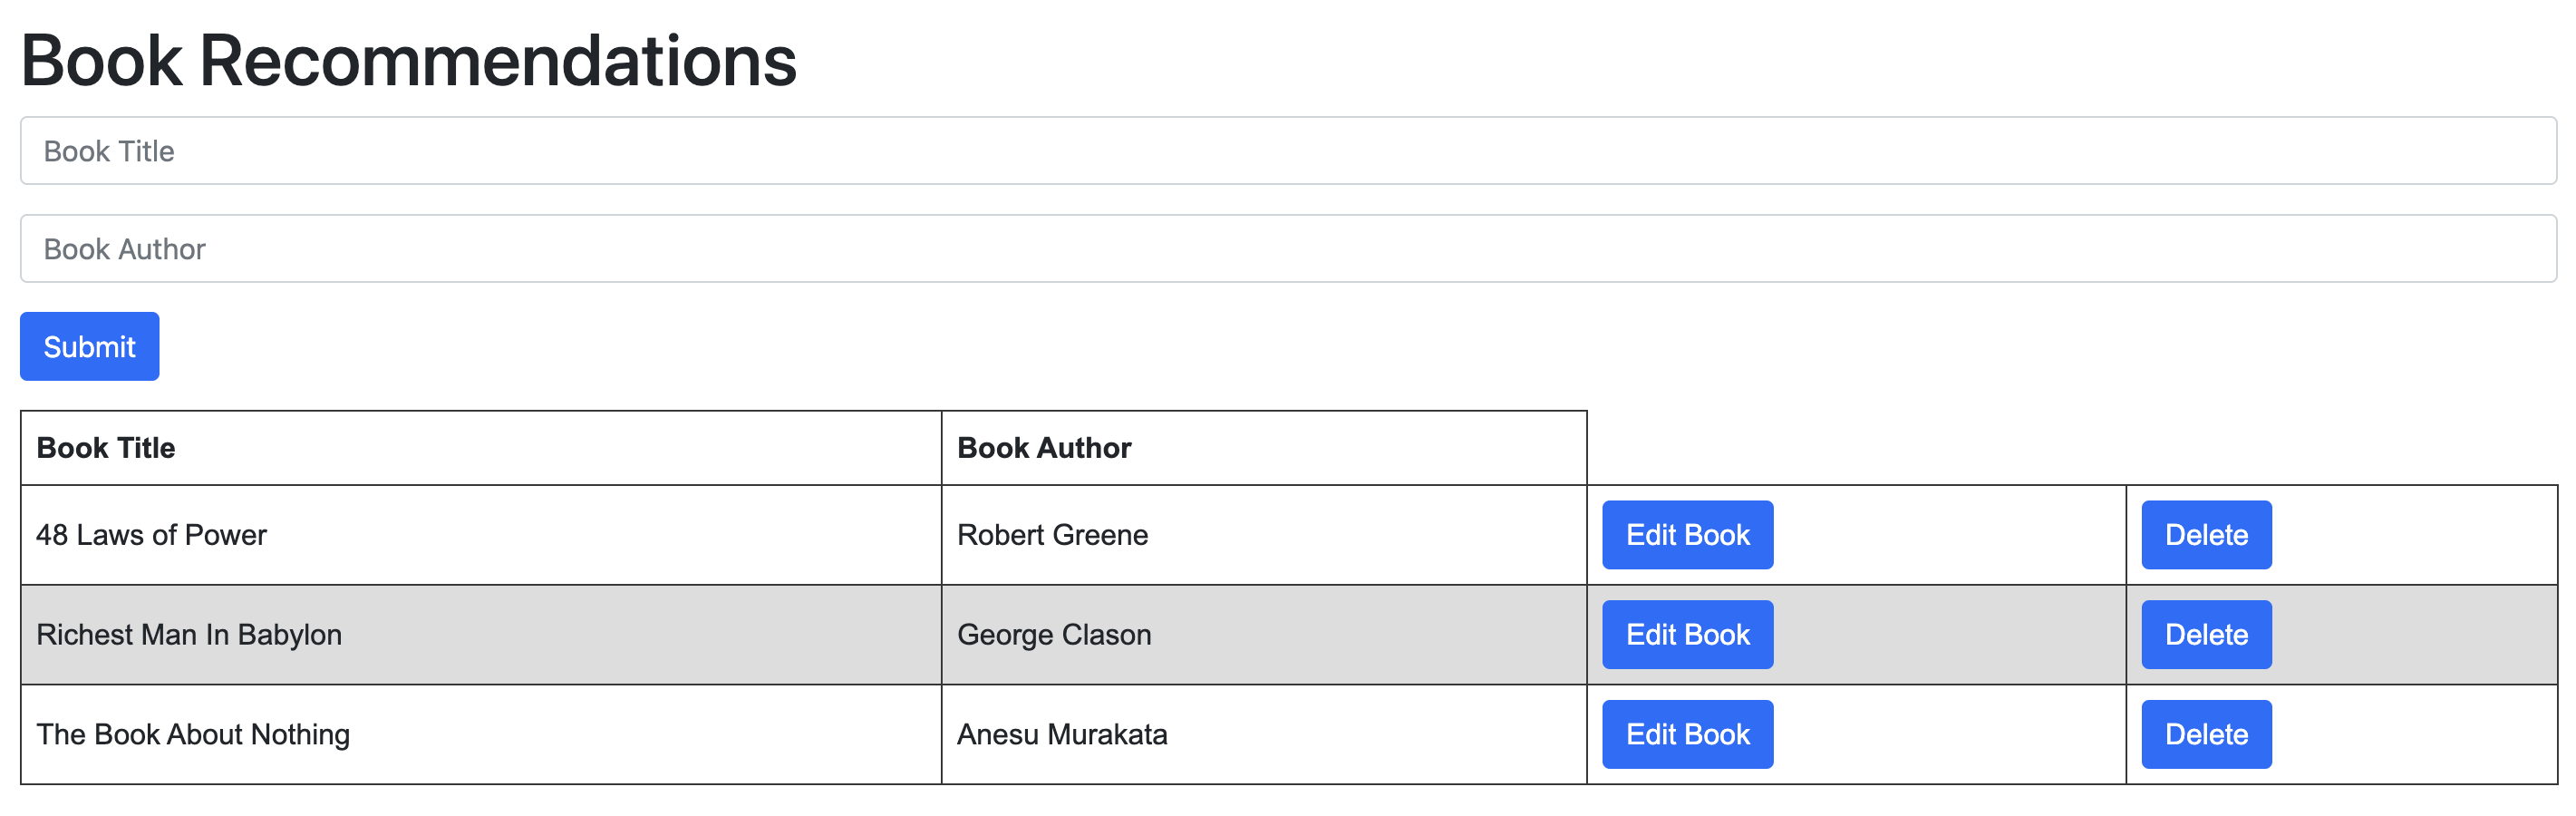
In this tutorial, we’ll explore the benefits of HTMx by building a full-stack application using Express and HTMx. Our application will be a book recommendation app that supports CRUD functionality. The final app will look a bit like this:
Overview and Requirements
After building our application, you’ll want to deploy it to production, so you can show it to friends and family. You will therefore need the following to complete the tutorial:
- Git set up and installed, and a registered GitHub account
- A Code Capsules account
- Node.js installed
- An IDE or text editor of your choice
Setting up the Project
With all the requirements in place, we can go ahead and set up our project. Let’s start by creating the project folder.
Create Project Folder
Let’s create a folder to house our application’s source code. Run the commands below in the terminal to create the folder and navigate into it.
mkdir express-htmx
cd express-htmx
From here onwards, the express-htmx directory will be referred to as the project’s root folder.
Initialize Project
Run the command npm init in the project root folder and follow the setup instructions to create a new node.js project.
Install Dependencies
While still in the root folder, run the command below to install the dependencies we’ll need to build our application:
npm i express pug sequelize sqlite3
You might notice there’s no dependency for HTMx in our dependency list. This is because it will be added as a script tag inside the head of our HTML template.
Initialize an Empty Git Repository
From the project’s root folder, enter the command git init to initialize a git repository. This will allow you to track changes to your app as you build it.
Create a .gitignore file and add the line below to it:
/node_modules
This excludes the node_modules folder from being tracked as you build the app, which is OK since it has files that won’t change.
Linking to GitHub
Head over to GitHub and create a new repository. Then, in your project’s root folder, run the command below from the terminal, replacing username and repository_name with your own values from GitHub:
git remote add origin git@github.com:username/repository_name.git
This will link your local repository to the one on GitHub.
Building the HTMx Frontend
With the set-up complete, we can now begin building our app. We will start with the HTMx frontend, and for this, you need to create a /views folder inside the project’s root folder.
Next, create an index.pug file inside the /views folder, and populate it with the code below:
<doctype html>
<html lang='en'>
  <head>
    <title>Book Recommendations</title>
    <link rel='stylesheet' href='https://cdn.jsdelivr.net/npm/bootstrap@5.0.0-beta1/dist/css/bootstrap.min.css'>
    <script src='https://unpkg.com/htmx.org@1.5.0'></script>
    <style>
      body {padding: 20px}
      table {font-family: arial, sans-serif; border-collapse: collapse; width: 100%;}
      tr.htmx-swapping td {opacity: 0; transition: opacity 0.5s ease-out;}
      td, th {border: 1px solid #383737; text-align: left; padding: 8px;}
      tr:nth-child(even) {background-color: #dddddd;}
    </style>
  </head>
There’s not much going on in the code snippet above, except for lines 5 and 6, which are responsible for loading Bootstrap and HTMx into our index page. This gives you the power to build an interactive page just by including the <script> tag that links to HTMx, without needing to install any npm packages like with most SPAs. This is how HTMx allows you to build sites that are more lightweight compared to SPA frameworks.
The code underneath the <style> tag adds CSS to style our frontend to make it more visually appealing. Now let’s add code that will be rendered in the body tag of our page. Copy and paste the code below with the same level of indentation as the </head> tag:
<body>
  <h1>Book Recommendations</h1>
  <form hx-post="/submit" hx-swap="beforeend" hx-target="#new-book" class="mb-3">
    <input type="text" placeholder="Book Title" name="title" class="form-control mb-3">
    <input type="text" placeholder="Book Author" name="author" class="form-control mb-3">
    <button type="submit" class="btn btn-primary">Submit</button>
  </form>
  <table>
    <thead>
      <tr>
        <th>Book Title</th>
        <th>Book Author</th>
      </tr>
    </thead>
    <tbody id="new-book" hx-target="closest tr" hx-swap="outerHTML swap:0.5s">
      <each book in books>
        <tr>
          <td>#{book.name}</td>
          <td>#{book.author}</td>
          <td>
            <button class="btn btn-primary" hx-get="/get-edit-form/${book.id}">Edit Book</button>
          </td>
          <td>
            <button hx-delete="/delete/${book.id}" class="btn btn-primary">Delete</button>
          </td>
        </tr>
      </each>
    </tbody>
  </table>
</body>
There are a couple of attributes here that aren’t used in traditional HTML. Let’s go over them one by one:
- hx-[http method] – Examples of this attribute include
hx-post,hx-get,hx-put, andhx-delete. This is the HTMx way of denoting what type of request should be sent on form submission or when a request-firing event is triggered. These attributes accept the request route as an argument. In the case of our form, we use the/submitroute, while the table buttons send requests to the/deleteand/get-edit-formroutes. - hx-target – This attribute accepts the
idof the element you want to update after a successful request or when an event is triggered. Take note of the preceding#that’s written before the ID value.- You might have noticed that we didn’t use an
idvalue in the table, but used a value of closesttrinstead. This swaps the closest table row with the HTML that will be returned by the request when an action is triggered. The closest row will always be the same row in which an event or request was triggered, either by the “Edit Book” button or the “Delete” button.
- You might have noticed that we didn’t use an
- hx-swap – The hx-swap attribute allows you to specify how you want to partially reload the page or swap elements with new ones. It updates the UI in the section specified in the
hx-targetattribute.- In our form, we used the
beforeendvalue to tell HTMx that we want to append the result of the request after the last child in the target element, which is the table withid=new-book. - In the table, however, we used the
outerHTMLvalue to denote that we wish to swap the entire<tr>element with the returned content. - A full list of acceptable
hx-swapvalues can be viewed here.
- In our form, we used the
Building the Express Backend
We can now dive into building the backend of our app. Start by creating an app/model/ directory from the project root folder and creating a file named dbconfig.js in it. This file will contain logic for creating a SQLite database on a persistent file storage Data Capsule on Code Capsules when we deploy our application. Populate the dbconfig.js file with the code below:
const { Sequelize } = require("sequelize");
const persistent_path = process.env.PERSISTENT_STORAGE_DIR || ".";

const sequelize = new Sequelize("test-db", "user", "pass", {
  dialect: "sqlite",
  host: persistent_path + "/dev.sqlite",
});

module.exports = sequelize;
The value of the PERSISTENT_STORAGE_DIR environment variable will contain the path to the persistent file storage Data Capsule on Code Capsules. We will use Sequelize as our ORM to make interacting with the database easier.
Create a Book Model
After creating the database, we have to define the model of objects we’ll be reading and writing to it. Add a file named book.js in the /model folder and fill it with the code below:
// represents the model

const { Model, DataTypes } = require("sequelize");
const sequelize = require("./dbconfig");

class Book extends Model {}

Book.init(
  {
    id: {
      type: DataTypes.INTEGER,
      primaryKey: true,
    },
    name: {
      type: DataTypes.STRING,
    },
    author: {
      type: DataTypes.STRING,
    },
  },
  {
    sequelize,
    modelName: "book",
    timestamps: false,
  }
);

module.exports = Book;
Our Book objects will have three fields for the id, name, and author. The last line exports an instance of the Book model, which we’ll use in other project files to perform CRUD operations on the database.
Add App Routes
The next step is to add the views responsible for executing the CRUD operations we’ll be performing on book objects. Create an index.js file in the project root folder and add the following code to it:
const express = require("express");
const bodyParser = require("body-parser");
const sequelize = require("./app/model/dbconfig");
const Book = require("./app/model/book");

// automatically creating table on startup
sequelize.sync({ force: true }).then(async () => {
  console.log("db is ready...");
});

const app = express();
app.use(express.json());

// Configuring body parser middleware
app.use(bodyParser.urlencoded({ extended: false }));
app.use(bodyParser.json());

app.set("view engine", "pug");

const PORT = process.env.PORT || 3005;
app.listen(PORT, () => {
  console.log(`Service endpoint = http://localhost:${PORT}`);
});
In the snippet above, we import the modules our app depends on, initialize an app object, and add logic to create a Books table in our database when the application first runs.
Let’s add an index route that fetches and returns all Book objects from the database when a user visits the landing page. Add the following code to index.js above the const PORT = process.env.PORT || 3005; line:
app.get("/", async (req, res) => {
  const books = await Book.findAndCountAll();
  return res.render("index", { books: books.rows });
});
We use the Sequelize Book model object we defined in the book.js file to query the database for all book objects in a readable format using the findAndCountAll() method and not raw SQL. This is the major benefit of using an ORM to interact with a database.
Next, we’ll add a /submit route that will be called when a user submits a new book entry. This route will be responsible for saving and returning the id of the recently saved book to the database. Paste the code below into index.js:
app.post("/submit", async (req, res) => {
  const book = {
    name: req.body.title,
    author: req.body.author,
  };
  await Book.create(book).then((x) => {
    // send id of recently created item
    return res.send(`<tr>
        <td>${req.body.title}</td>
        <td>${req.body.author}</td>
        <td>
            <button class="btn btn-primary"
                hx-get="/get-edit-form/${x.null}">
                Edit Book
            </button>
        </td>
        <td>
            <button hx-delete="/delete/${x.null}"
                class="btn btn-primary">
                Delete
            </button>
        </td>
    </tr>`);
  });
});
As HTMx expects an HTML response, the submit method responds with an HTML table row that updates the list of books on the frontend. The new entry will be for the recently added book.
Next, let’s add the code for the /delete route. Copy and paste the code below:
app.delete("/delete/:id", async (req, res) => {
  const id = req.params.id;
  await Book.findOne({ where: { id: id } }).then((book) => {
    book.destroy();
    return res.send("");
  });
});
The first thing you may have noticed about this route is the id query parameter it accepts. This allows us to know which object to delete. After deleting the book, we return an empty string, which causes the row we deleted in the frontend to disappear, as it is swapped for “nothing”.
We now have routes for creating, reading, and deleting books. It’s time to add routes associated with updating book entries to complete our app’s CRUD functionality. Add the code below to index.js to add logic for updating book entries to your app:
app.get("/get-book-row/:id", async (req, res) => {
  const id = req.params.id;
  await Book.findOne({ where: { id: id } }).then((book) => {
    return res.send(`<tr>
        <td>${book.name}</td>
        <td>${book.author}</td>
        <td>
            <button class="btn btn-primary"
                hx-get="/get-edit-form/${id}">
                Edit Book
            </button>
        </td>
        <td>
            <button hx-delete="/delete/${id}"
                class="btn btn-primary">
                Delete
            </button>
        </td>
    </tr>`);
  });
});

app.get("/get-edit-form/:id", async (req, res) => {
  const id = req.params.id;
  await Book.findOne({ where: { id: id } }).then((book) => {
    return res.send(`<tr hx-trigger='cancel' class='editing' hx-get="/get-book-row/${id}">
        <td><input name="title" value="${book.name}"/></td>
        <td><input name="author" value="${book.author}"/></td>
        <td>
          <button class="btn btn-primary" hx-get="/get-book-row/${id}">
            Cancel
          </button>
          <button class="btn btn-primary" hx-put="/update/${id}" hx-include="closest tr">
            Save
          </button>
        </td>
      </tr>`);
  });
});

app.put("/update/:id", async (req, res) => {
  const id = req.params.id;
  // update book
  await Book.findByPk(id).then((item) => {
    item
      .update({
        name: req.body.title,
        author: req.body.author,
      })
      .then(() => {
        return res.send(`<tr>
            <td>${req.body.title}</td>
            <td>${req.body.author}</td>
            <td>
                <button class="btn btn-primary"
                    hx-get="/get-edit-form/${id}">
                    Edit Book
                </button>
            </td>
            <td>
                <button hx-delete="/delete/${id}"
                    class="btn btn-primary">
                    Delete
                </button>
            </td>
        </tr>`);
      });
  });
});
There’s more than one route for the update logic, and we’ll see why shortly. The /get-edit-form route is called when a user clicks on the “Edit Book” button on the frontend, and it returns a form for updating the selected book. If the user decides to cancel this action, the /get-book-row route is called, and it returns a table row with the unedited book entry.
If the user goes through with updating the book, then the /update route is called, and it will update the book based on the id supplied to it as a query parameter. When the update is complete, the method returns an HTML table row with the updated book.
Add Start Script
Code Capsules automatically runs the npm start command to start node projects. Currently, our project doesn’t have a start command, so let’s add one in package.json. Modify the "scripts" dictionary in the package.json file so that it looks like this:
"scripts": {
  "test": "echo "Error: no test specified" && exit 1",
  "start": "node index.js"
},
When you’ve added the start script, Code Capsules will be able to automatically run your app when you deploy it.
Running our App
Our app is ready to be tested. Navigate to the project’s root folder in a terminal and run the following command: npm run start. This should start up a development server on port 3005. Open your browser at http://127.0.0.1:3005/ and you should see your app running.
Add, Commit, and Push Git Changes
Let’s add and commit all the files we created to our local repository and then push them to the remote one. Do this by running the commands listed below in a terminal while in the project’s root folder:
git add -A
git commit -m "Added book recommendation app files"
git branch -M main
git push -u origin main
Your remote repository will now be up-to-date with your local one.
Deploy to Code Capsules
The final step is to deploy our app. Log into your Code Capsules account and link your remote GitHub repository to Code Capsules. Create a persistent storage Data Capsule and a Backend Capsule and bind the two together to deploy the app. You can follow this reference guide to see how to do so in greater detail.
That’s it! Your “Book Recommendations” app should be live and fully functional now.